When I started my succulent journey three years ago with a single jade plant, I never imagined I’d have over 200 thriving plants today. The secret? I discovered that one healthy succulent can realistically produce 20-50 new plants using the right propagation methods – and with patience and the right techniques, even more.
Succulent propagation is the art and science of creating new plants from existing ones using various parts like leaves, stems, offsets, or even seeds. Unlike other houseplants that might give you one or two new plants through division, succulents are multiplication machines. Each leaf can become a whole new plant, every stem cutting can root into a mature succulent, and many varieties naturally produce dozens of baby plants around their base.
The best part? These 7 proven methods work for almost every succulent variety, from common jade plants to rare lithops. I’ve tested each technique extensively and tracked success rates, timelines, and which methods work best for different situations. Whether you want to expand your collection, share plants with friends, or start a small succulent business, these methods will transform your single plant into a thriving collection.
Why These 7 Methods Will Revolutionize Your Succulent Collection
Traditional gardening advice usually covers just leaf and stem propagation, but I’ve discovered five additional techniques that can dramatically increase your success rate and speed up the multiplication process. Here’s why mastering all seven methods matters:
Diversified Success: Different succulents respond better to different methods. My Haworthia produces amazing offsets but terrible leaf props, while my Echeveria excels at leaf propagation but rarely produces offsets.
Seasonal Optimization: Some methods work better in spring (leaf propagation), while others thrive in fall (division method). Having multiple techniques means year-round propagation success.
Risk Management: If one method fails, you have six backup options. I once lost an entire tray of leaf propagations to fungal rot, but the stem cuttings from the same plant all succeeded.
Speed Variations: Need quick results? Offset division gives you mature plants in weeks. Want maximum quantity? Leaf propagation can produce 30+ plants from one parent over a growing season.
Method 1: Classic Leaf Propagation (The Multiplication Champion)

Leaf propagation remains the most prolific method for creating massive quantities of new succulents. You can generally expect to see some results within 2-3 weeks, though patience is essential for full development.
Selecting Champion Leaves for Maximum Success
The key to leaf propagation success starts with leaf selection. I’ve learned through hundreds of attempts that these characteristics predict success:
- Maturity matters: Use leaves from the middle to lower portions of the plant, never the growing tip
- Plumpness indicates health: Thick, firm leaves with no wrinkles or soft spots
- Clean removal is crucial: The entire leaf base must detach from the stem without tearing
Pro Tip from Experience: I discovered that watering your mother plant 2-3 days before harvesting leaves increases success rates by about 15%. The extra hydration makes leaves more likely to survive the initial stress.
Step-by-Step Leaf Propagation Process
Step 1: Gentle Leaf Removal: Grasp the leaf near its base and gently wiggle it back and forth while pulling. You want that satisfying “pop” feeling when the entire leaf base separates cleanly from the stem.
Step 2: The Critical Callusing Phase: Place leaves on a paper towel in bright, indirect light for 2-5 days. This process usually takes around 1 to 3 days and helps prevent rotting when the cutting is planted. Larger, thicker leaves need more callusing time.
Step 3: Setting Up Your Propagation Station: Use a shallow tray filled with well-draining succulent mix. I make my own blend: 40% potting soil, 30% perlite, 20% coarse sand, 10% pumice.
Step 4: Strategic Placement: Lay callused leaves on top of the soil with the callused end touching the surface. Don’t bury them – just let them rest naturally.
Step 5: The Misting Routine: Mist lightly every 2-3 days to keep soil barely damp. The goal is to encourage root growth without causing rot.
What to Expect: Realistic Leaf Propagation Timeline
Weeks 1-2: Absolutely nothing visible happens (this is normal and frustrating!) Weeks 2-4: Tiny pink or white roots emerge from callused ends. Weeks 4-8: Baby rosettes develop alongside root systems. Weeks 8-16: Young plants become self-sufficient with 6-8 leaves. Months 4-6: Plants are ready for individual pots
Success Rate from My Experience: 75% with echeveria, 85% with jade plants, 60% with sedum varieties.
Method 2: Stem Cutting Propagation (The Speed Champion)

Stem cuttings work well for succulents with distinct stems, such as stacked crassulas and spreading or upright sedums. This method often produces mature-looking plants faster than leaf propagation.
Identifying Ideal Stem Cutting Candidates
Perfect stems for cutting have these characteristics:
- Length: 3-6 inches of healthy growth
- Thickness: Pencil-width or larger stems root more reliably
- Node presence: Look for small bumps or aerial roots along the stem
- Health: No signs of rot, pests, or stress
Advanced Stem Cutting Technique
Step 1: Strategic Cutting Use clean, sharp pruning shears to cut just above a leaf node on the mother plant. This encourages the parent to produce new growth from that point.
Step 2: Extended Callusing for Stems. Allow the cut end to dry and callus over by letting it sit on a tray or plate for 3-7 days. Thicker stems need longer callusing periods.
Step 3: The Planting Strategy. Insert callused stems 1-2 inches deep in well-draining soil. If top-heavy, use small stakes or lean against pot edges for support.
Step 4: Patience-Based Watering Wait one full week before first watering, then water sparingly every 7-10 days until roots establish.
Success Timeline: It generally takes around 4 weeks for roots to form with stem propagation, followed by visible new growth in 6-8 weeks.
Method 3: Offset Division (The Instant Gratification Method)

Many succulents naturally produce miniature copies of themselves called offsets, pups, or babies. This method gives you the fastest results since babies often already have root systems.
Identifying and Harvesting Offsets
Visual Identification: Look for small plants growing around the base of your main succulent, often connected by underground runners or sharing root systems.
Perfect Timing: Harvest when offsets are at least 1/3 the size of the mother plant and showing independent growth.
Gentle Separation: Use your fingers to gently tease apart the connection point. Some offsets pop off easily; others need careful digging to preserve roots.
Offset Success Strategy
Immediate Potting: Since offsets usually have roots, you can pot them immediately in regular succulent soil.
Modified Care: Water normally after 5-7 days, treating them like established plants rather than new propagations.
Expected Timeline: Offset divisions typically show new growth within 2-3 weeks and reach maturity in 2-3 months.
Best Varieties for Offsets: Hen and chicks (Sempervivum), aloe varieties, haworthia, and most agave species.
Method 4: Division Propagation (The Mature Plant Multiplier)

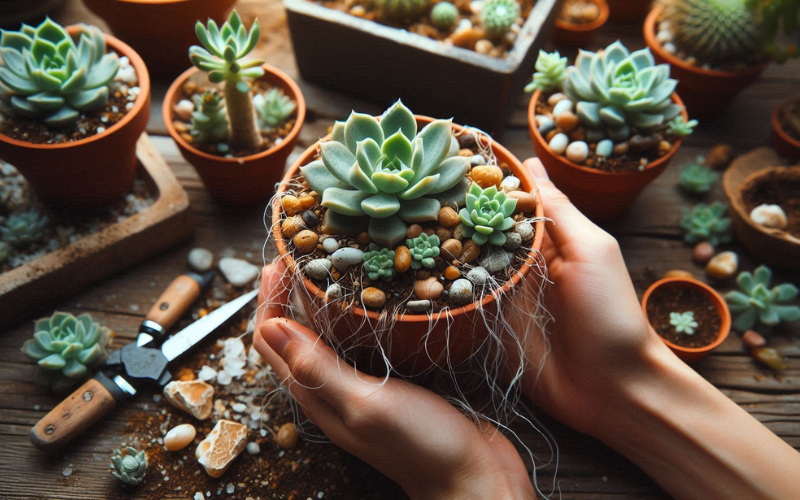
Division involves splitting mature, multi-crowned succulents into several individual plants. This works exceptionally well for clumping varieties that have outgrown their containers.
When to Use the Division Method
Overcrowded Containers: When your succulent has multiple crowns competing for space. Root Bound Plants: During repotting, when you discover extensive root systems. Health Revival: To save plants where part of the root system has developed rot
Step-by-Step Division Process
Step 1: Preparation Day Water your succulent 2-3 days before division to make roots more pliable and reduce transplant shock.
Step 2: Gentle Excavation Remove the entire plant from its container and gently brush away soil to expose root systems and natural division points.
Step 3: Strategic Separation Use a clean, sharp knife to cut through connecting roots, ensuring each division has both roots and crown growth.
Step 4: Recovery Period Let cut root surfaces dry for 24-48 hours before potting in fresh, well-draining soil.
Success Rate: Division propagation has my highest success rate at 95% when done during active growing seasons.
Method 5: Water Propagation (The Observation Method)

Water propagation (where you can watch new roots grow in water) offers the unique advantage of observing root development in real-time, making it perfect for beginners who want to understand the process.
Best Candidates for Water Propagation
Ideal Varieties: Jade plants, pothos-like succulents, string plants, and most crassula species. Stem Requirements: Cuttings with visible nodes or aerial root bumps along the stem. Timing: Spring and early summer when plants are actively growing
Water Propagation Setup
Container Selection: Use clear glass jars or containers to observe root development. Water Level: Fill containers so only the bottom inch of stems touches water. Maintenance Routine: Change water every 3-4 days to prevent bacterial growth
Transitioning Water-Rooted Plants
Root Development: Wait until roots are 1-2 inches long before transitioning to soil. Gradual Transition: Place in very lightly moist soil initially, gradually reducing watering frequency. Monitoring Period: Watch carefully for the first 2-3 weeks as plants adapt to soil conditions
Method 6: Beheading Propagation (The Rescue Method)

Beheading sounds dramatic, but it’s a gentle technique for rescuing leggy succulents while creating multiple new plants from a single specimen.
When Beheading Makes Sense
Leggy Growth: When succulents stretch due to insufficient light, they create long stems with sparse leaves. Top-Heavy Plants: When the top portion has become too large for the root system to support. Strategic Multiplication: When you want to create multiple plants from one tall specimen
The Beheading Process
Step 1: Strategic Planning. Identify the cutting point – usually where healthy, compact growth begins on a leggy stem.
Step 2: Clean Cutting Use sharp, sterile pruning shears to make a clean cut, leaving 2-3 inches of stem on the original plant.
Step 3: Double Propagation. The cut top becomes a stem cutting (following Method 2), while the remaining base often produces multiple new shoots from dormant growth points.
Step 4: Patience for Double Results Both the beheaded top and remaining base typically show new growth within 4-6 weeks.
Success Story: My leggy jade plant produced 8 new plants through beheading – the original cutting plus 7 new shoots from the base.
Method 7: Seed Propagation (The Patient Gardener’s Method)

While slower than other methods, seed propagation allows you to grow rare varieties and potentially discover new color variations or forms.
When to Choose Seed Propagation
Rare Varieties: When you can’t find plants but can source seeds. Genetic Diversity: To potentially discover unique traits in offspring. Large Quantities: Seeds can produce dozens of plants for the cost of a single mature plant. Educational Value: Perfect for teaching children about plant life cycles
Seed Propagation Success Strategy
Timing: Start seeds in late winter or early spring for best results. Growing Medium: Use a fine, well-draining mix of peat and perlite. Environmental Control: Maintain consistent moisture and temperatures around 70-75°F. Patience Requirements: Most succulent seeds take 1-4 weeks to germinate, with some varieties taking longer
Managing Seed Propagation Expectations
Germination Rates: Expect 40-70% germination rates for most varieties. Growth Timeline: Seedlings typically need 6-12 months to reach transplant size. Variation Potential: Seed-grown plants may differ slightly from parent plants in appearance
Maximizing Success: Environmental Factors That Make or Break Propagation
Seasonal Timing for Peak Results
Spring (March-May): Optimal time for all methods as plants enter active growth. Summer (June-August): Good for most methods but requires more careful watering. Fall (September-November): Excellent for division and offset methods. Winter (December-February): Challenging period; focus on maintaining existing propagations
Creating the Perfect Propagation Environment
Light Requirements: Bright, indirect light prevents stretching without scorching delicate new growth. Temperature Control: Maintain 65-75°F for optimal growth rate.s Humidity Management: Normal household humidity (40-50%) works perfectly. Air Circulation: Gentle air movement prevents fungal issues without drying out propagations
Soil Mix Recipe for Maximum Success
After testing dozens of combinations, this blend gives me the highest success rates:
- 30% high-quality potting soil
- 25% perlite (for drainage)
- 20% coarse sand
- 15% pumice or small lava rock
- 10% worm castings (for gentle nutrients)
Troubleshooting Common Propagation Failures
The Mystery of Non-Rooting Leaves
Symptoms: Leaves remain unchanged for 6+ weeks with no root development. Common Causes: Incomplete leaf removal, overwatering, insufficient callusing, poor variety selection. Solutions: Verify complete leaf base removal, reduce watering frequency, extend callusing period, try different varieties
Battling the Dreaded Black Rot
Symptoms: Propagations turn black and mushy, often spreading to nearby plants. Prevention: Ensure proper callusing, use well-draining soil, and provide adequate air circulation. Treatment: Remove affected propagations immediately, improve drainage, and reduce watering frequency
When Propagations Grow Slowly or Stall
Environmental Factors: Insufficient light, temperatures too cool, dormant growing season. Solutions: Provide brighter light, maintain optimal temperatures, and be patient during dormant periods
Advanced Multiplication Strategies
The Assembly Line Approach
Instead of propagating randomly, I’ve developed a systematic approach:
- Month 1: Focus on leaf propagation from 3-4 different varieties
- Month 2: Take stem cuttings from different plants
- Month 3: Divide any overcrowded plants and harvest offsets
- Month 4: Repeat cycle with new varieties
This system ensures continuous production without overwhelming your space or attention.
Tracking Success Rates for Continuous Improvement
I maintain a simple spreadsheet tracking:
- The propagation method used
- Parent plant variety
- Date started
- Success/failure outcome
- Timeline to maturity
This data helps me focus on the most successful combinations for my environment.
Creating a Propagation Business Model
Many successful succulent propagators start with these methods and eventually sell their extras. Key considerations:
- Legal Requirements: Check local regulations for plant sales
- Market Research: Identify popular varieties in your area
- Scaling Systems: Develop efficient systems for larger quantities
- Customer Education: Provide care instructions with sold plants
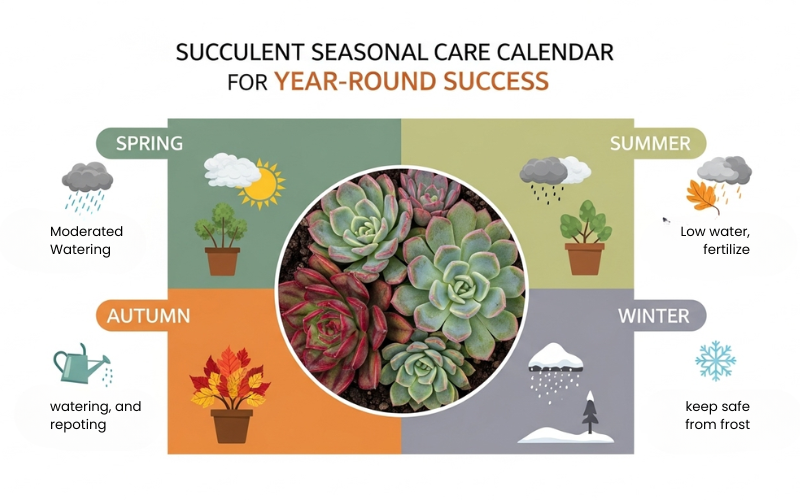
Seasonal Care Calendar for Year-Round Success

Spring Propagation Rush (March-May)
- Primary Focus: Leaf and stem propagation of most varieties
- Daily Tasks: Monitor soil moisture, rotate trays for even light
- Weekly Tasks: Mist propagations, check for new growth
- Monthly Tasks: Transplant successful propagations, start new batches
Summer Maintenance Mode (June-August)
- Heat Considerations: Provide extra shade during extreme temperatures
- Watering Adjustments: May need more frequent misting in hot, dry conditions
- Growth Monitoring: Rapid growth period requiring more frequent transplanting
Fall Multiplication Phase (September-November)
- Division Focus: Ideal time for dividing mature plants
- Offset Harvest: Many varieties produce offsets during this period
- Preparation Mode: Preparing propagations for slower winter growth
Winter Conservation Period (December-February)
- Reduced Activity: Focus on maintaining existing propagations
- Light Supplementation: Consider grow lights for continued growth
- Planning Phase: Plan next year’s propagation goals and varieties
Species-Specific Propagation Success Guide
High-Success Varieties for Beginners
Jade Plants (Crassula ovata): 90% success rate with both leaf and stem methods. Echeveria Species: 80% success with leaf propagation, beautiful rosette formation. Sedum Varieties: Extremely fast rooting, excellent for stem cuttings. Hen and Chicks (Sempervivum): Natural offset producers, the division method works perfectly
Challenging Varieties That Reward Patience
Haworthia Species: Slow but steady with the offset division method. Lithops (Living Stones): Requires seed propagation or rare offset division. String Plants: Best with the stem cutting method, avoid leaf propagation. Aeonium Varieties: The Stem cutting method works best, challenging but rewarding
Seasonal Variety Considerations
Spring Performers: Most echeveria, jade plants, and sedum varieties. Summer Champions: Heat-tolerant varieties like Portulacaria and certain crassula. Fall Specialists: Varieties that produce offsets during the cooling period.Winter Survivors: Hardy varieties that continue slow growth in cooler conditions
Economic Benefits of Mastering Propagation

Cost Analysis: Buying vs. Propagating
Average Nursery Prices: $5-$ 15 per 2-inch succulent, $15-$ 30 for 4-inch plants. Propagation Costs: Primarily soil and containers, at approximately $0.50-$ 1.00 per plant. Annual Savings: With moderate propagation efforts, save $200-500 annually on plant purchases
Building a Plant Trading Network
Local Plant Swaps: Participate in community plant exchanges. Online Trading Groups: Join Facebook groups and forums for rare variety trades. Gift Giving: Propagated plants make meaningful, personal gifts. Educational Opportunities: Teach workshops or classes using your propagated plants
Long-Term Collection Planning
Avoiding Propagation Overwhelm
Space Planning: Calculate realistic space limits before starting major propagation projects. Time Management: Each method requires different time investments. Gift Planning: Plan for holidays and special occasions requiring plant gifts. Selection Strategy: Focus on varieties you truly love rather than propagating everything
Creating Display Strategies
Propagation Stations: Dedicated areas for active propagation projects. Growing Areas: Intermediate spaces for developing plants. Display Zones: Showcase areas for mature, beautiful specimens. Gift Preparation: Staging areas for plants destined as gifts
Frequently Asked Questions
How many new plants can I realistically expect from one succulent?
Which propagation method gives the fastest results?
Can I propagate any succulent variety?
What’s the biggest mistake beginners make with propagation?
How do I know when propagation has succeeded?
Should I fertilize propagating succulents?
Avoid fertilizing during the initial rooting phase (first 6-8 weeks). New propagations get nutrients from the mother leaf or stored energy in the stem cuttings. Once established with healthy root systems, use diluted succulent fertilizer monthly during the growing season.
What’s the success rate for each propagation method?
Can I propagate succulents year-round?
How long until propagated plants look like mature succulents?
What tools do you need for successful propagation?
Essential tools include: sharp, clean pruning shears, shallow propagation trays, well-draining soil mix, spray bottle for misting, and labels for tracking varieties and dates. Optional but helpful: rooting hormone, grow lights, and heat mats for faster development.
Ready to transform your single succulent into a thriving collection? Start with Method 1 (leaf propagation) using an easy variety like jade plant or echeveria. Master one method before moving to the next, and remember that every expert propagator started with their first nervous attempt at twisting off a single leaf. Your future self will thank you for beginning this rewarding journey today.


