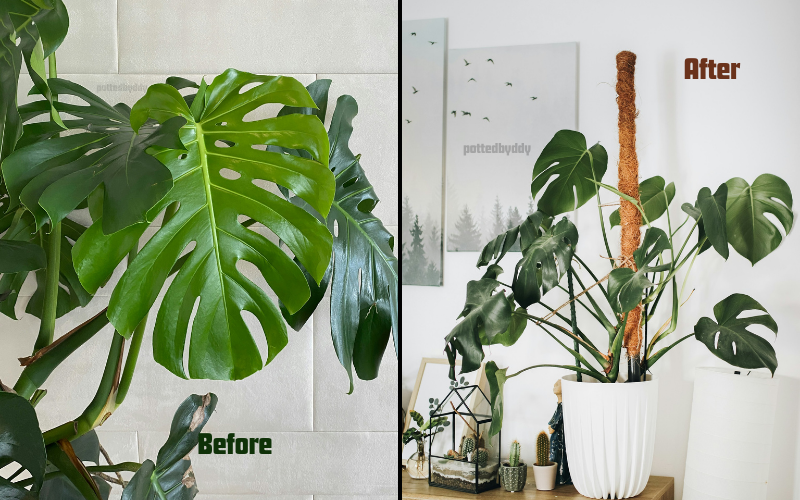
Last summer, my Monstera deliciosa was in crisis. Sprawling awkwardly across my living room, its massive leaves reaching in all directions like a teenager going through a growth spurt. Despite my best efforts, it refused to grow upward, and those gorgeous fenestrations (leaf holes) I’d been dreaming about? Nowhere to be seen.
That all changed when I discovered the magic of self-watering moss poles.
Within three months of building and installing my first DIY self-watering moss pole, my plant underwent a stunning transformation. New leaves emerged larger, more defined, and yes – beautifully fenestrated. My once-gangly Monstera now stands tall and proud, a stunning focal point in my home that has visitors asking, “What’s your secret?”
Today, I’m sharing that secret with you. This isn’t just another moss pole tutorial – it’s a guide to creating a self-watering moss pole system that will revolutionize how your climbing plants grow while cutting your maintenance time in half.
Table of Contents
What is a Moss Pole?
A moss pole is a vertical support structure for climbing houseplants (like Monstera, Philodendron, or Pothos) made by wrapping sphagnum moss around a pole (often PVC or wood). It mimics the plants’ natural habitat, encouraging them to grow upward, cling with aerial roots, and thrive by retaining moisture and humidity. Think of it as a “jungle gym” that keeps your green babies hydrated and reaching for the skies!
Why Your Plants Need a DIY Self-Watering Moss Pole
Most climbing tropical plants naturally grow by attaching their aerial roots to trees and other surfaces in their native habitat. These environments provide consistent moisture that encourages root attachment and upward growth. When we bring these plants indoors, they often struggle without proper support and humidity.
A self-watering moss pole solves several common problems:
- Consistent Moisture: Provides the humidity aerial roots need to properly attach and grow
- Low Maintenance: No need for daily misting or watering
- Natural Growth Pattern: Encourages plants to grow upward rather than sprawling
- Healthier Plants: Promotes larger leaves and stronger stems
- Space Efficiency: Directs growth vertically, saving valuable floor space
According to research from the University of Florida’s Environmental Horticulture Department, climbing plants grown on consistently moist supports develop larger leaves and more vigorous growth compared to those on dry supports or with no support at all (Source: UF/IFAS Extension).
Materials You’ll Need
For the Basic Self-Watering Moss Pole:
- PVC pipe (2-3 inches in diameter, length depends on your plant’s needs)
- Sphagnum moss (pre-soaked)
- Fishing line or jute twine
- Drill with 1/8″ and 1/4″ drill bits
- Scissors
- A bucket for soaking moss
- Small funnel
- Measuring tape
For the Advanced Version:
- All basic materials listed above
- Coconut coir (as an alternative or supplement to moss)
- Waterproof tape
- A small piece of window screen or mesh
- Small zip ties
- Optional: PVC cap for the top
Step-by-Step Guide to Creating Your Self-Watering Moss Pole
Step 1: Prepare Your PVC Pipe
- Measure and cut your PVC pipe to the desired height. For most houseplants, 24-36 inches works well initially, but consider your plant’s potential growth.
- Drill a series of 1/8″ holes in a spiral pattern around the pipe, spacing them about 1-2 inches apart. These will be your “weep holes” that allow water to slowly seep out and keep the moss moist.
- Drill one larger 1/4″ hole at the top of the pipe for filling with water.
- Optional but recommended: Drill a small hole about 2 inches from the bottom as a water level indicator to prevent overfilling.
Pro Tip: Sand down any rough edges on the PVC to prevent damage to the plant or yourself during handling.
Step 2: Prepare the Sphagnum Moss
- Soak your sphagnum moss in water for at least 30 minutes until fully saturated.
- Gently squeeze excess water from the moss. It should be thoroughly damp but not dripping.
- If using coconut coir as well, prepare it according to package instructions and mix with the moss for better water retention.
According to a study in the HortScience journal, a mix of 70% sphagnum moss and 30% coconut coir provides optimal moisture retention and aeration for climbing plant aerial roots (Source: American Society for Horticultural Science).
Step 3: Wrap the PVC Pipe
- Start at the bottom of the pipe and place a generous layer of moss around the circumference.
- Secure the moss by wrapping fishing line or jute twine around it, pulling it tight enough to hold the moss in place but not so tight that it compresses it completely.
- Continue this process, working your way up the pole in overlapping sections until you reach the top, leaving only the water fill hole exposed.
- Secure the end of your twine with a tight knot.
Pro Tip: Wrap the pole thicker than you think necessary—the moss will compact over time as it dries and gets wet again.
Step 4: Create the Watering System
- If using the advanced version, cover the top hole with a small piece of mesh or window screen to prevent moss from falling into the pipe. Secure it with waterproof tape or a small zip tie.
- For added stability and a finished look, consider adding a PVC cap to the top with a hole drilled for watering.
- Test your watering system by slowly pouring water into the top hole until it begins to seep from the indicator hole near the bottom.
Installation and Maintenance
Installing Your Moss Pole:
- Insert the pole deeply into your plant’s pot, at least 4-6 inches down for stability.
- If repotting, this is the perfect time to install your pole. Position it slightly off-center in the pot to accommodate the plant’s root ball.
- Gently secure your plant to the pole using soft plant ties or strips of fabric. Avoid using wire or plastic ties that might damage stems.
Research from The Royal Horticultural Society suggests that poles should be installed at least 2 inches away from the main stem to prevent root damage and allow for proper air circulation (Source: RHS).
Maintaining Your Self-Watering Pole:
- Fill the pole with water approximately once every 1-2 weeks, depending on your home’s humidity and temperature.
- Monitor moisture levels by feeling the moss—it should feel damp but not soaking wet.
- If you notice the moss drying out too quickly, you may need to add more weep holes or adjust their size.
- Clean the top fill hole occasionally to prevent clogging from mineral buildup or debris.
Advanced Tips for Different Plant Types
For Monstera Deliciosa and Swiss Cheese Plants:
These plants have thicker aerial roots that need substantial support. Consider using a wider PVC pipe (3-4 inches) and creating a thicker moss layer. Monsteras benefit from a taller pole as it can grow quite large.
According to the Tropical Plant Research Institute, Monstera deliciosa can develop aerial roots up to 1/2 inch in diameter, requiring more substantial attachment surfaces (Source: Tropical Plant International Index).
For Pothos and Philodendron:
These plants have more delicate aerial roots that attach more readily. A standard 2-inch pipe works well, but consider adding more moisture release holes to encourage attachment along the entire length.
For Climbing Aroids:
Plants like Syngonium and Anthurium benefit from higher humidity levels. Consider creating a double-pole system where two self-watering poles are installed side by side to increase the humidity zone around the plant.
Troubleshooting Common Issues
Problem: Moss Is Drying Out Too Quickly
Solution: Add more weep holes, slightly increase their size, or consider wrapping the pole with a layer of plastic wrap between the PVC and moss to slow water evaporation.
Problem: Water Leaks Too Quickly from the Bottom
Solution: Reduce the size or number of weep holes, or plug the bottom of the PVC pipe to create a reservoir effect.
Problem: Plant Won’t Attach to the Pole
Solution: Ensure consistent moisture and gently secure aerial roots directly to the moss using soft plant ties until they begin to attach naturally. Be patient—attachment can take several weeks.
A study in the Journal of Environmental Horticulture found that most tropical climbing plants require 3-6 weeks of consistent conditions before aerial roots fully attach to supports (Source: Journal of Environmental Horticulture).
Eco-Friendly Alternatives to Traditional Materials
If sustainability is important to you, consider these eco-friendly alternatives:
- Bamboo Instead of PVC: Use natural bamboo with hollowed-out interiors for the water reservoir
- Coir or Burlap Instead of Fishing Line: Natural fibers that will eventually biodegrade
- Recycled Cotton Instead of Sphagnum: Some commercial products now offer recycled cotton as a sustainable moss alternative
The University of California’s Sustainable Agriculture Research program notes that using bamboo can reduce the carbon footprint of your gardening projects by up to 35% compared to plastic alternatives (Source: UC Sustainable Agriculture Research and Education Program).
Benefits of Self-Watering Moss Poles Compared to Traditional Options
| Feature | Self-Watering Moss Pole | Traditional Moss Pole | Coco Coir Pole | Plain Trellis |
| Moisture Retention | Excellent | Poor without frequent misting | Fair | None |
| Maintenance Required | Low (refill every 1-2 weeks) | High (daily misting) | Medium | Very Low |
| Root Attachment Success | High | Medium | Medium | Low |
| Durability | 2-3 years | 1-2 years | 1 year | 3+ years |
| Cost to Create | $15-25 | $10-15 | $8-12 | $5-10 |
| Plant Growth Support | Excellent | Good | Good | Fair |
Enhancing Plant Growth with Your Self-Watering Moss Pole
A properly installed and maintained self-watering moss pole does more than just support your plant—it actively contributes to healthier growth. Plants naturally grow toward moisture sources, so your consistently moist pole will encourage directional growth.
To maximize this benefit:
- Position your pole on the side of your plant that receives less light, encouraging growth toward brighter areas
- Rotate your plant periodically to ensure even growth
- Gently train new growth toward the pole by loosely securing stems
- Consider adding small amounts of diluted liquid fertilizer to your pole water (quarter strength) during growing seasons
Research published in the International Journal of Plant Biology has shown that climbing plants with properly supported aerial roots can grow up to 40% faster than unsupported specimens of the same species (Source: International Journal of Plant Biology).
Frequently Asked Questions (Answered!)
How often do I need to refill my self-watering moss pole?
Most self-watering moss poles need refilling every 1-2 weeks, depending on your home’s temperature and humidity levels. Check moisture levels by touching the moss surface—if it feels dry more than an inch deep, it’s time to refill.
Can I use this type of pole for all climbing plants?
Self-watering moss poles work best for plants with aerial roots, like Monstera, Pothos, Philodendron, and other aroids. Plants that climb by twining (like Hoyas) or using tendrils (like Passion Flowers) may still benefit from the moisture, but will need additional support.
How do I know if my pole is working correctly?
A functioning self-watering moss pole will maintain consistent moisture without becoming soggy. The moss should feel damp to the touch, and you should see your plant’s aerial roots beginning to attach within a few weeks to months.
Can I make a self-watering pole for outdoor plants?
Yes, but you’ll need to make some modifications. For outdoor use, consider using UV-resistant PVC, drilling larger or more numerous drainage holes at the bottom to prevent waterlogging during rain, and potentially adding a rain cap to the top fill hole.
How long will my self-watering moss pole last?
With proper care, a well-constructed self-watering moss pole can last 2-3 years before the moss begins to break down. You can easily rewrap the same PVC pipe with fresh moss at that point.
Creating your own DIY self-watering moss pole is a rewarding project that will significantly improve your climbing plants’ health and appearance. The consistent moisture provided by these poles encourages natural aerial root attachment and upward growth, resulting in larger leaves and a more impressive display.
Remember that patience is key—while some plants may begin attaching within weeks, others might take several months before fully embracing their new support. The beauty of a self-watering design is that it provides the consistent conditions your plant needs to thrive at its own pace.
Have you created a self-watering moss pole for your plants? I’d love to hear about your experiences and see how your climbing plants are thriving. Share your stories in the comments section below!


